This year has been pretty good for painting, almost all of it for Saga.
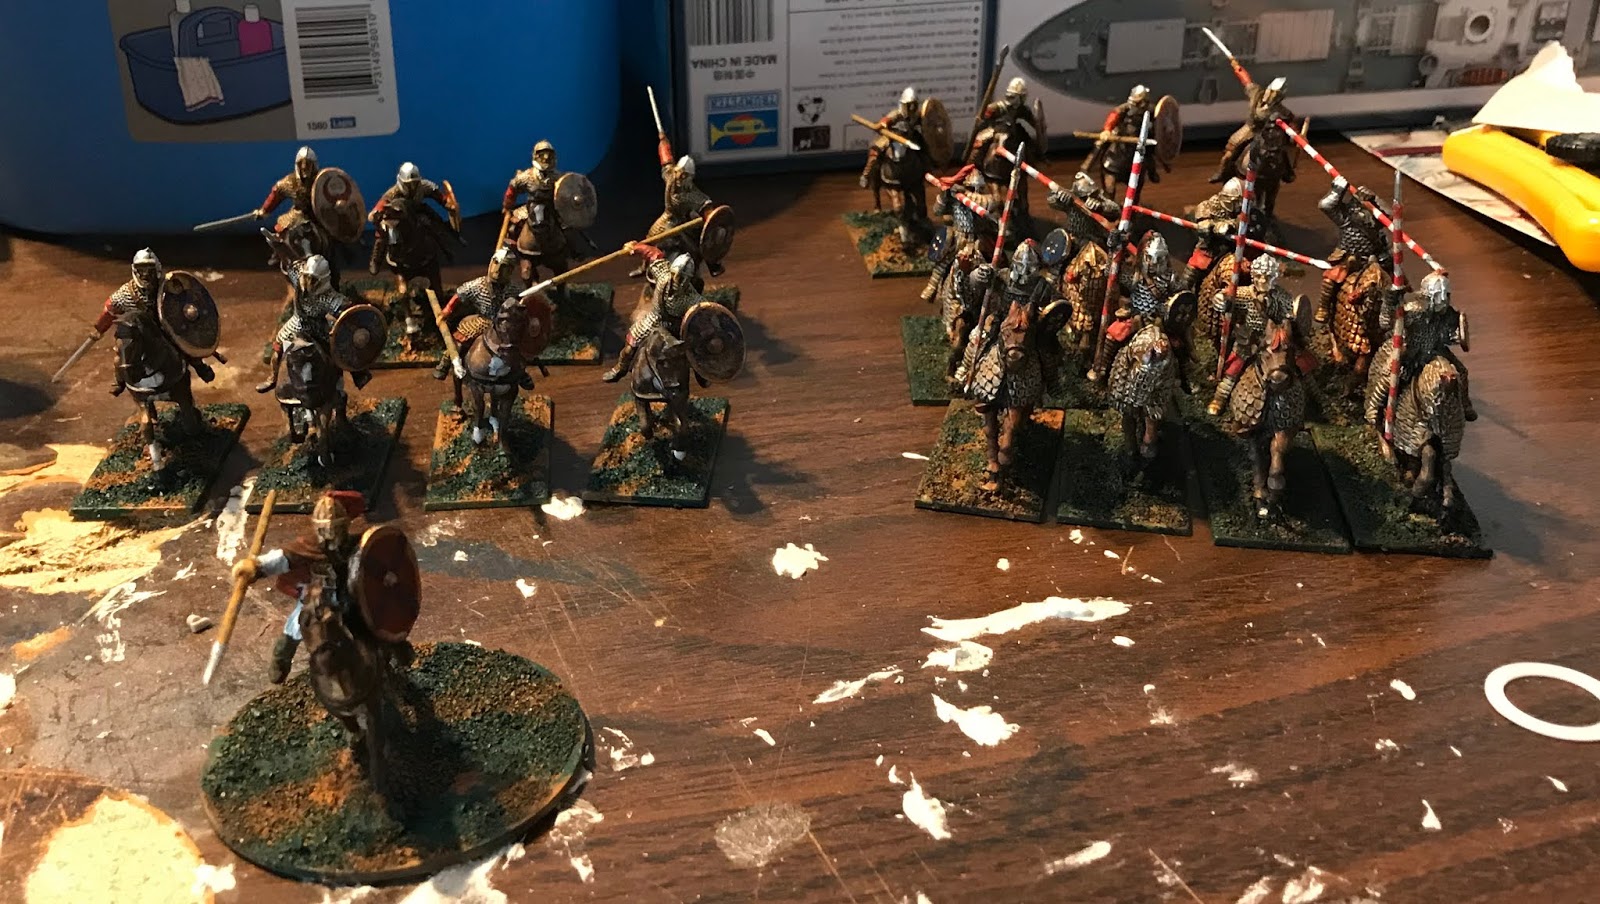
I finished off my Late Roman Warband. This was supposed to be combined with some of my Early Romans to make a more balanced force but I discovered I couldn't easily re-base them so I have this all hearthguard cavalry force which is not really a winning strategy in Saga. Still it should be fun to play and I think the Cataphracts will work well for my usual playstyle of concentrating too much on one good unit.
Once I finished off the Romans I made some good progress on my Franks. I got base colours on them all and ordered some decals. Because I still didn't have enough to do a force with Roland (he needs 4 points of foot at the beginning and then 4 points of mounted after he dies), I have bought a 4 point starter box of Goths who will masquerade as Franks when required.
When the Age of Magic was announced I put the Franks on hold to work on the Revenants. They are still a work in progress. Half are just primed and the others have block flesh colours. If I can get through them this month and then paint the Undead Legions next month I will be in good shape for the Age of Magic event at Cangames
While working on the other stuff, I finished off the two Viking Champions I got from ordering from Gripping Beast as well as Boadicea and Cartamanda.
Finally, once I had my airbrush working again I decided to actually paint something for the Stalingrad Campaign and built a Lend-Lease Churchill force. They are only primed so far but should paint up quickly once I get the right colour.
Plans for the coming months focus on Cruel Seas terrain for Cangames and the undead for Saga: Age of Magic. After that it will be some more Saga terrain and the Franks/Goths. I might turn the airbrush on some Team Yankee Warsaw Pact forces if the mood strikes.
Showing posts with label 28mm. Show all posts
Friday, April 5, 2019
Sunday, February 3, 2019
SAGA Battle Royale: Spanish vs Crusaders vs Eastern Princes
As we were starting to set up we realized that the terrain table for the multi-player games (which are played on a 4x6 table rather than usual 3x4) had more terrain types than the basic terrain table and so, naturally, Mike and Stan were demanding lakes and crevasses which I had not made in my terrain making frenzy over Christmas
After we selected terrain that was actually available we set up. We didn't put a great deal of thought into the setup of either the terrain or our forces and we ended up with me on one side between some wood, Stan in the centre around the rocky hill and Mike in the corner.
The turn sequence of the Battle Royale scenario is quite clever. Each player starts with 6 tokens and when you take your turn you give up one token and then you pass the turn to the player with most tokens (and you can choose if there is more than one with the same number)
In the first few turns we did some manuevering. I got some good use of the Iberia ability which allows the Spanish Jinites (mounted warriors) to react to an enemy movement or shooting to move or shoot (and it is a basic ability so you can put multiple dice on it.
Mike moved a force on my left which did some damage to my but it was isolated enough that I could gang up on it and wipe it out with no further loss to myself
There were no clear sides in the fighting in the centre with everyone attacking everyone else. I probably got involved a bit more closely than I should and took some losses (but so did everyone else)
On the second last turn I used the Jinites! ability which allows a unit of Jinites (no surprise there) to activate as many times as you want (it still suffers fatigue for each activation) and reduces the armour of all its shooting targets by one -- you can only shoot each target once in the turn though. I did quite a bit of damage to both Mike and Stan with this but I didn't get far enough away at the end so Mike managed to catch and kill the exhausted unit. It was quite a fun exchange of Saga abilities and fatigue discarding since Mike had an ability which added the attack dice of another unit (in this case, his Warlord) and I had an ability that removed all his attack dice (Treachery) and it would be better for me if he played his first (it worked out the other way in this case).
The victory points were based on Survival points and Stan had quite a bit more left than Mike or I so he was declared the winner.
My warlord survived the game (which is unusual for me) and I really enjoyed the Spanish board. If I were going to play again I would take 2 units of Hearthguard again but go for 4 units of Jinetes. Since I had such a struggle painting them this time, I probably won't be rushing into actually doing that any time soon.
The Battle Royale scenario worked really well and I will certainly play it again (and who knows, maybe I will have made lakes and crevasses by then)
Sunday, September 11, 2016
Siege of Fort Beausejour
At Cangames way back in May, Ed ran his siege of Beausejour game. I don't really recall any real details of the game (other than losing, and rolling really badly to get the first nations forces to take any interest in helping out) so I am just going to post some pictures with comments without trying to provide any sort of overall narrative.
Looking towards the fort from the British battery positions on the hill.
The view from the French side.
The British move up in their seigeworks.
One of the buildings is destroyed by the British bombardment.
The British in their trenchworks get ready to assault.
More of the buildings wiped out by fire
New England Rangers move up to the fort.
The main British force moves up.
The British reach the edge of the ditch.
Storming the bastion, the British overwhelm the defenders.
Only one more Cangames game to post! -- As well as getting through my backlog of pictures, I have managed to prime all the Project Z figures I have assembled and done a little bit of painting on my Franks.
Looking towards the fort from the British battery positions on the hill.
The view from the French side.
The British move up in their seigeworks.
One of the buildings is destroyed by the British bombardment.
The British in their trenchworks get ready to assault.
More of the buildings wiped out by fire
New England Rangers move up to the fort.
The main British force moves up.
The British reach the edge of the ditch.
Storming the bastion, the British overwhelm the defenders.
Monday, September 5, 2016
State of the Game and Zombie progress
Well the blog might itself might have seen a bit zombie-like for most of this year. I have been quite busy and I do have some posts to finish on Cangames and my trip to Louisburg and some other odd games but I thought I would just post on what I am working on right now.
I have been very busy with work this year and my painting has been a bit start and stop but I have made some progress on painting my Franks for Saga -- I was slightly disheartened by reading the strategy discussion on the Muskets and Tomahawks forum which suggests the Franks are among the weakest factions but I still like the idea of them (and especially the special rules around Roland).
I have had 2 games in with them (and anyone who knows my Saga playing habits, 2 games with any one faction is almost a record) and I think I am getting a sense for how they work. (Not taking any Levy until the Saga dice are maxed out seems to be a key to the strategy so painting the Levy first was probably not the smartest thing to do)
Frostgrave is also high on my gaming schedule and I have started quite a few figures for it but never seem to get any finished.
I had bought the starter bundle for Warlord games Project Z in the spring and in attempt to get it actually painted and ready, I have committed to running a game in November. Although I was working for a large part of this weekend, Ed came up on Saturday afternoon and I managed to glue together all the figures from the basic box plus the Special Ops and Ed was very excited to see the Z-Mart terrain from Sarrisa Precision so he did quite a good job in getting that together and painted.
There are somethings that I had planned to paint but haven't -- My US forces for Team Yankee are still mostly sitting in their shrink wrapped boxes. I was going to buy an infantry force for my Italians for the upcoming campaign at the club and I decided I didn't really want to paint that much 15mm infantry so I didn't even buy them -- I do have some tanks that I didn't get painted last time that I will paint up and I have been sort of looking at ebay to see if there is a painted Fucilere force since I would like to have one even if I don't want to paint one.
Hopefully the blog will get updated much more often with some progress on these projects (and the backlog games as well)
Labels:
28mm,
Franks,
Frostgrave,
Modelling,
Painting,
Project Z,
Saga,
Sarrisa Precision
Monday, February 15, 2016
Lion Rampant: A belated AAR
Last month, Stan and Mike came over for a game of Lion Rampant and of Frostgrave and I am finally getting around to making a post for it (Mike was much more timely with his description of the battle)
We had been considering putting on a Crusades game at Cangames with the Lion Rampant rule and this seemed like a good time to give them a try. Mike and I had both read the rules but no one had done any real prep work (like army lists or that sort of thing). We decided we would go for 12 points a side with the Crusader army divided in 2 with 2 commander (only one of which would be active on any given turn)
My force consisted of 2 mounted Serjeants with bows, 2 units of mounted yeoman and 2 units of foot yeoman. The crusaders had (I think) one unit of Knights and one of Crossbow and then a bunch of heavy foot.
My initial plan was to harass the crusader infantry with bow fire while avoiding the knights. This plan would have worked better if I had realized (or read) that the mounted yeomen also had bows.
I ended up getting caught in various melees which I lost, partly because I was outclassed but also because my rolls in combat were pretty poor -- I think I made nearly every command roll though
In the end it was a fun game but the rules were a bit too simple and the special rules for each unit type weren't so special (in the way the "useful rules" in Hail Caesar can really help to add character to a different troop type). We seemed to be in agreement that for smaller 2 player games, SAGA is much more fun (though more complicated) and if we were going to be playing a bigger game, Hail Caesar would have been the way to go. There are some good features to the rules and it wouldn't be too hard to make special rules for each unit without going overboard. The "boasts" were you get victory points for performing some act of daring are quite good.
I think the rules would be really good for a con, they are simple and mostly intuitive. After playing them I had some ideas of what I would like to do at Cangames but a week or so later, I was convinced that what I really wanted to do was run a Roman game (using Hail Caesar) at Cangames so that is the current plan!
We also played a game of Frostgrave which turned out really well, probably the best game of that so far but for some reason my camera was set for really long exposures and all my pictures ended up as blurs. (We are also going to run that at Cangames)
We had been considering putting on a Crusades game at Cangames with the Lion Rampant rule and this seemed like a good time to give them a try. Mike and I had both read the rules but no one had done any real prep work (like army lists or that sort of thing). We decided we would go for 12 points a side with the Crusader army divided in 2 with 2 commander (only one of which would be active on any given turn)
My force consisted of 2 mounted Serjeants with bows, 2 units of mounted yeoman and 2 units of foot yeoman. The crusaders had (I think) one unit of Knights and one of Crossbow and then a bunch of heavy foot.
My initial plan was to harass the crusader infantry with bow fire while avoiding the knights. This plan would have worked better if I had realized (or read) that the mounted yeomen also had bows.
I ended up getting caught in various melees which I lost, partly because I was outclassed but also because my rolls in combat were pretty poor -- I think I made nearly every command roll though
The battle continued in this vein, I became a bit more effective with the bows as I came to grips with the rules but the crusaders kept the upper hand. I don't really remember any of the details so I will just present the rest of the pictures I took
In the end it was a fun game but the rules were a bit too simple and the special rules for each unit type weren't so special (in the way the "useful rules" in Hail Caesar can really help to add character to a different troop type). We seemed to be in agreement that for smaller 2 player games, SAGA is much more fun (though more complicated) and if we were going to be playing a bigger game, Hail Caesar would have been the way to go. There are some good features to the rules and it wouldn't be too hard to make special rules for each unit without going overboard. The "boasts" were you get victory points for performing some act of daring are quite good.
I think the rules would be really good for a con, they are simple and mostly intuitive. After playing them I had some ideas of what I would like to do at Cangames but a week or so later, I was convinced that what I really wanted to do was run a Roman game (using Hail Caesar) at Cangames so that is the current plan!
We also played a game of Frostgrave which turned out really well, probably the best game of that so far but for some reason my camera was set for really long exposures and all my pictures ended up as blurs. (We are also going to run that at Cangames)
Monday, December 14, 2015
Frostgrave: The Eclipse
The second game of the weekend was a game of Frostgrave, playing the Eclipse scenario which is the fist scenario from the newish "Thaw of the Lich Lord" book.
Mike used the same warband as he had from our previous set of Frostgrave games (as related here) and I chose the same type of wizard (Sigilist) but, since I had lost my paperwork, I started a new warband from scratch.
We made the table with a castle wall and a series of larger buildings separated from it by a wide street. There is more open LOS here than is recommended by the Frostgrave rules but this was balanced to a degree by the eclipse special rules which reduced the distance for LOS.
I had split my warband in 2 and sent the apprentice with a smaller force along the top of the castle wall and my wizard with the rest of the warband along the road to the near treasure.
Reaching the first treasure turned out to be quite easy but it turned out that disturbing the treasure attracted the attention of an ice troll who came on the table behind my warband.
The ice troll made short work of my thief who was carrying the treasure, fortunately he was far enough away from the rest of my warband that he didn't automatically move towards them but he stayed near the treasure for the rest of the game so no one got that one.
Soon the two warbands meet in the middle of the table and combat ensues. I briefly had the upper hand by distracting the enemy templar with the "Furious Quill" and almost killing him with bow fire. The group on the wall managed to get another treasure (and disturbed some wild dogs)
The dogs came on on one of the neutral sides and just wandered around their entry point for the whole game.
As the battle in the street went on, things got worse and worse for me.
Things started to go badly on the tower as well, I did get the first treasure away but lost the fight over the next treasure at the top of the tower.
In a move of desperation the apprentice climbed up the tower and cast explosive rune where the treasure was. When the enemy moved, the rune exploded and caused great carnage but sadly the only survivor was one of Mike's warband. In the following turns everyone in my warband was killed except the thief that managed to get off with the treasure.
I ended up with 1 treasure, Mike got 4 and the ice troll kept 1. When we checked the warband for casualties I only had one warrior who was seriously injured (sadly it was the best one!) but Mike had several deaths.
We did set up the treasure properly this time (the treasure is placed before table sides are chosen) so I think that made a big difference and the eclipse did a bit of interest. In the post game discussion we decided that a lot of the house rules we used last time were not really needed except for the one that removed the gain of XP for killing enemy warband.
Looking forward to more Frostgrave in the New Year!
Sunday, December 13, 2015
Saga: Moors vs Rus
So Mike was over this weekend and we played a game of Saga and then we had a game of Frostrgrave. This is the battle report of the Saga game.
We played a 7 point game so that I could use the Moorish army that I have been painting up. I had bin Yusuf, a hearthguard unit of 8 African Horse, a hearthguard unit of 8 Black Guard and a warrior unit of 8 mounted on camels. I did have an Imam painted as well but I felt I already had enough special rules to deal with this time around.
Mike had a Rus army (I think it was Christian Rus rather than Pagan Rus, but really, they are all infidels anyway!). He had a unit of 8 mounted hearthguard (much like the Black Guard, they cost an extra point and have several special powers), a unit of 12 Levy bow and 2 units of 12 Warriors. We decided to play the river crossing scenario from the original Saga book.
My plan, such as it was, was to have the Black Guard move on to the right ford and have the mounted units sweep across the left ford and crush all in their path.
I started out sensibly by moving slowly up and using some of my board abilities to slow down the Rus.
The Rus were also being sedate in their advance.
By the second or third turn my instinct to immediately get stuck in took over and the Black Guard crossed over the ford with Ben Yusuf.
And the horsemen charged across the ford into the Rus horse (who had killed one of my horse on the previous turn with bow fire). It was at this point that I realized that several of the battle board abilities I was counting on for this attack wouldn't work because they are armed with javelins and the abilities specify that they only work for troops not armed with missile weapons.
My horse were forced back with great loss and managed to inflict no damage on the Rus
The remains of my horse were wiped on the following Rus turn (they weren't so keen to attack the Black Guard though...)
The Black Guard smashed into the Rus warriors driving them back over the hill but they did lose a stand to the levy bow on the hill.
The Rus began to move towards the left ford with only the camels between them and victory.
The Black Guard finished off the warriors and faced off against the levy bow.
The camels charged across the river into the mounted Rus and just disappeared in a mist of tawny fur and blood. I had hoped to do a bit better here due to the penalty of horse fighting camel but it was not to be.
The Rus crossed over the river and the hearthguard took a few bow shots at the Black Guard to no effect.
At the end of the game the Black Guard had not quite wiped out the bow. The Rus won handily with what they had crossed the river with.
I was reasonably happy with how things went given that it was my first time playing with this force. I really didn't take much advantage of Ben Yusuf's special abilities and I think that having 2 big hearthguard units (especially when one costs an extra point) is not really a good strategy (but this list was based on what I had just painted and wanted to play with). I think the next time I play with them I will not take Ben Yusuf but just the Black Guard with foot warriors and maybe levy bow or one unit of mounted warriors. The other way to go is to go with Ben Yusuf and a mostly mounted force and use the abilities to slow down the enemy and then pick of units at the edge.
I have now played with all 3 of the Islamic armies from Crescent and Cross and I like them all, the Moors might be my favourite but they are all close. For the next few games, I want to use more foot (some of which is still being painted but I should be able to finish them off over Christmas) and also try out the 3 varieties of Cleric. I do want to just stick with these three armies to try and learn them a bit better (sticking to one would be better but I don't think I can limit my self to that).
This was the first time I had played at 7 points and I think it worked ok because we had both taken special units or figures. I don't think that there would be much point in going to an even larger point value (though maybe will will try and find the upper limit in the future...)
We also talked about using Lion Rampant with these figures to run a Crusades game at Cangames. I have since read some reviews and it seems it would work well for that . I will probably get the Kindle version and read it over the holidays.
We played a 7 point game so that I could use the Moorish army that I have been painting up. I had bin Yusuf, a hearthguard unit of 8 African Horse, a hearthguard unit of 8 Black Guard and a warrior unit of 8 mounted on camels. I did have an Imam painted as well but I felt I already had enough special rules to deal with this time around.
Mike had a Rus army (I think it was Christian Rus rather than Pagan Rus, but really, they are all infidels anyway!). He had a unit of 8 mounted hearthguard (much like the Black Guard, they cost an extra point and have several special powers), a unit of 12 Levy bow and 2 units of 12 Warriors. We decided to play the river crossing scenario from the original Saga book.
My plan, such as it was, was to have the Black Guard move on to the right ford and have the mounted units sweep across the left ford and crush all in their path.
I started out sensibly by moving slowly up and using some of my board abilities to slow down the Rus.
The Rus were also being sedate in their advance.
By the second or third turn my instinct to immediately get stuck in took over and the Black Guard crossed over the ford with Ben Yusuf.
And the horsemen charged across the ford into the Rus horse (who had killed one of my horse on the previous turn with bow fire). It was at this point that I realized that several of the battle board abilities I was counting on for this attack wouldn't work because they are armed with javelins and the abilities specify that they only work for troops not armed with missile weapons.
My horse were forced back with great loss and managed to inflict no damage on the Rus
The remains of my horse were wiped on the following Rus turn (they weren't so keen to attack the Black Guard though...)
The Black Guard smashed into the Rus warriors driving them back over the hill but they did lose a stand to the levy bow on the hill.
The Rus began to move towards the left ford with only the camels between them and victory.
The Black Guard finished off the warriors and faced off against the levy bow.
The camels charged across the river into the mounted Rus and just disappeared in a mist of tawny fur and blood. I had hoped to do a bit better here due to the penalty of horse fighting camel but it was not to be.
The Rus crossed over the river and the hearthguard took a few bow shots at the Black Guard to no effect.
At the end of the game the Black Guard had not quite wiped out the bow. The Rus won handily with what they had crossed the river with.
I was reasonably happy with how things went given that it was my first time playing with this force. I really didn't take much advantage of Ben Yusuf's special abilities and I think that having 2 big hearthguard units (especially when one costs an extra point) is not really a good strategy (but this list was based on what I had just painted and wanted to play with). I think the next time I play with them I will not take Ben Yusuf but just the Black Guard with foot warriors and maybe levy bow or one unit of mounted warriors. The other way to go is to go with Ben Yusuf and a mostly mounted force and use the abilities to slow down the enemy and then pick of units at the edge.
I have now played with all 3 of the Islamic armies from Crescent and Cross and I like them all, the Moors might be my favourite but they are all close. For the next few games, I want to use more foot (some of which is still being painted but I should be able to finish them off over Christmas) and also try out the 3 varieties of Cleric. I do want to just stick with these three armies to try and learn them a bit better (sticking to one would be better but I don't think I can limit my self to that).
This was the first time I had played at 7 points and I think it worked ok because we had both taken special units or figures. I don't think that there would be much point in going to an even larger point value (though maybe will will try and find the upper limit in the future...)
We also talked about using Lion Rampant with these figures to run a Crusades game at Cangames. I have since read some reviews and it seems it would work well for that . I will probably get the Kindle version and read it over the holidays.
Subscribe to:
Posts (Atom)


