Showing posts with label Ottawa Miniatures Gamers. Show all posts

Thursday, March 17, 2022

Battle of Bobruisk

 I played a Flames of War game the other night as part of the clubs's current Bagration campaign and decided to resurrect my blog to post my thoughts on the game.


I was playing against Daniel La Salle who set up the table and was fielding a Hungarian infantry force supported by a unit of Hetzers and a unit of Hungarian tanks with the German "Armoured Train" -- really infantry and some armoured cars-- as well as a German Pioneer unit. As he was out of supply his basic force was reduced.


I decided  that since I was attacking a city I would take as much artillery as I could so my force was based around a T-34/85 Battalion with 2 companies of 5 tanks each. I took a battery of Katyushas, one of  152mm howitzers, one of 122mm guns and a small battery of 76mm guns. For Firestorm I had a battery of SU-76 self-propelled 76mm guns plus another 3 T3/85s. To round out I took 7 OT-34/76 flame tanks -- and an armoured car with an observer


We were playing the rearguard scenario so I had 9 turns to win so I just had to be patient and not rush forward while there were still threats around (I have never been able to do this)
My tanks did well on the first few turns bashing the Hetzers and the Hungarian made tanks and not taking too much damage in return but my artillery was not all that effective -- not ranging in and not doing too much when it hit. To be fair I probably fired too much of it at the enemy armour since my tanks were doing a much better job of killing the tanks. Three 75mm ATGs appeared from ambush in the crossroads and did quite a bit of damage, I should have been more proactive in moving out of LOS from them.

Soon the Hetzers were wiped on the right flank and the other tanks were gone on the left.

At this point I should have moved some tanks up on the mortars which were damaging my artillery by this point but I figured with 2 batteries ranged in on them at this point I wouldn't need to do that

Some Hungarian infantry moved up to the hedgeline and got burned to crisp by the OT-34s -- I could have then moved them over to burn up the 75mm gus but I didn't want to disrupt my ranged in markers

The German pioneers moved up in the centre though the houses and took quite a pounding but when I moved my tanks to engage I got a bit too close the Hungarian infantry


They managed to close assault and broke my formation (since I only had 2 tank units in my base force). If I had been patient I think it would have been an easy win for me given the setup but I was to hasty and Daniel took full advantage of that. All lot of the damage my tanks took in my previous game against Mike was also done by infantry so I really need to become more aware of the real threat range of infantry.

The OT-34s are quite deadly, I would bring them out again and going with the T-34/85 worked well, I usually go with either a lot of T-34/76s or a smaller number of heavy tanks and I think the T-34/85 in the middle might be the best choice in general for the Soviets.

I am glad I tried this force and I might try something similar in the future but it is hard to rely on Russian Artillery


Sunday, April 7, 2019

Flames of War: Stalingrad Campaign battle report

This weekend I played a game of Flames of War at the Ottawa Miniatures Gamers meeting against Martin. This was the third round of games for the Stalingrad Firestorm camapaing but it was the first that I have played in.

I wasn't really super-excited to get anything new for this campaign but I did decide last weekend I would assemble and paint the 10 Plastic Soldier Company Churchills that I had bought (I think for a D-Day campaign several years ago). I airbrushed them with their base colour and added a bit of detail and shading and I think they turned out OK. I could have but some decals on them but to be honest, I really couldn't be bothered. I do have some 15mm tanks that I have put a lot of effort into but at the moment I don't really enjoy working on them relative to 28mm figures.

To round out the force -- the 10 Churchills (3 units of 3 plus HQ) cost 90 of my 100 points so I added in a Reconnaissance Platoon to take advantage of the spearhead rule and an SMG Company in case I had to hold an objective. I also had a unit of 2 IL-2 Shturmoviks as my Firestorm unit.
I set up with all the Churchills in the deployment bubble created by the Recon troops. Looking at this picture, I probably should have just forced the fight for the near objective by the bridge but I decided to try and force the Germans to spread out a bit so attacked on a broader front.

Martin had both 8.8cm AA and Marders which were the two things I feared. I had  hoped that my planes would be able to at least distract the 8.8cm guns but they were no where to be seen in the first 2 turns.
The 88s and Marders took out 2 of the Churchills on the objective on the first turn and the other Churchill pushed back the infantry and mortars along the river line. A unit of 2 captured T-34s appeared but I destroyed one and the other failed its last man standing roll. I was really worried but on the second turn the Marders and 88s missed (there might have been on or 2 hits from the Marders but I made my armour saves).

My IL-2s finally came in and took out one of the 88s and then other failed its last man standing roll (my lone Churchill on the bridge kept making its roll turn after turn). The other Churchills were taking out the Mortars and 10.5cm guns (which in hindsight was not really a good use of their time). I was ignoring the Panzer IIIs as their short 5.0cm guns couldn't penetrate from the front (the could get a tie)
On the last turn all my Churchill were bailed out and I couldn't get enough back in to make my Force Morale and lost. It ended up as a 6-3 due to the German losses.

It was a very enjoyable game and I think it looked like it was going to either way throughout the game.

I am still not super enthusiastic about Flames of War V4 but I will play games when they are available. I should be free to play next month so maybe I will try and infantry force next time.


Thursday, January 17, 2019

Cruel Seas Battle Report

Mike and both had our forces for this painted (admittedly, mine were painted by Ed) so we decided to give the game ago at the OMG.

We got two games in. For the first we played the introductory torpedo scenario where I had a tanker escorted by a single S-Boat and Mike had 2 Vosper MTBs that were trying to sink the tanker before it got off the table
My plan was simply to move the tanker as fast as it could go (not particularly fast!) and try and sink the British before they could fire their torpedoes.

I turned towards the British boats and opened fire. I soon realized that firing when traveling at full speed is not likely to hit but when I slowed down on the following turn I got some good hits wiping out one of the British Boats
The remaining boat launched one torpedo (Mike had forgotten to launch at the appropriate time and felt that firing only one was a reasonable compromise when I let him fire then later). The torpedo hit and wasn't a dud doing a lot of damage to the tanker but not quite enough to sink it

Closing in the British were able to sink the tanker with gunfire while the S-Boat was turning around

For the second game we were joined by 2 more player and used all the ships we had 2 S-38s, 2 S-100s on the German side and 3 Vosper MTB 1 and 3 Vosper MTB 2 on the British side.

We (the Germans) went around different sides of the island but the British tried to concentrate against Johns S Boats
There was a collision between one of the S-Boats and one of the Vospers (the smaller Vosper, unsurprisingly, came out much the worse) and some fierce gunfire on both sides. The Germans had an advantage both in firepower and luck and all the British boats were sunk to no losses to the Germans (though 2 of the boats were damaged)


Overall the game was a great sucess and Mike and I have decided to buy the British and German fleet boxes respectively.

I think I will run this at Cangames with some larger ships as targets (either Liberty Ships or something like a Monitor)


Thursday, January 10, 2019

SAGA Battle Report Moors (Umayyads) versus Normans

At the recent OMG club day I played a game of SAGA with my Moors in the form of the Umayyad list from the Old Friends, New Enemies list in the Age of Vikings book. I was playing against John Cowen's Normans.

I should probably start with an apology as when I looked up the spelling of Umayyad in the rulebook, I realized that I was not allowed to take the Crossbow unit as all levy needs to be equipped with bow (I had my doubts when I put my list together since they are Spanish mercenaries and don't really make sense for the time of the Umayyads but I wanted to do an all foot force so pushed ahead anyway)

As I was packing up to go to the club Canada Post dropped of a package with my new Mats by Mars 3X4 mat that I had bought especially for SAGA. Naturally, I brought that along with me. I am quite pleased with it, the price was good and it seems durable and it rolls up again neatly and it is lightweight. My only real complaint is that it is a bit glossy -- though not as much in person as it seems in the photos.

John got to pick the terrain and put down the 4 forests that I had out on the table -- A bit of disappointment since I had made all the different terrain pieces (and it turns out, not actually allowed under the rules since they permit 3 woods one of which can be large -- I can't imagine this really having any affect on the game)
We got the pincer setup where we each setup half our force in one of our corners and can set up right at the halfway line on the table. It was also a night game which meant if any unit started a turn more than S from a friendly unit it would gain a fatigue

I got the first turn and even though I was restricted to 3 dice I made good use of the Perserverance ability to shoot both my bow and crossbow at the Norman Knights killing a few figures and to charge my foot Hearthguard into the Norman crossbow killing all but one of them.
On the Norman turn the knights charged my crossbow unit but only managed to kill 7 of the Levy (enough that they lose their SAGA dice but leaving enough to still be a bit of a threat) and managed to kill another knight. A Norman foot warrior charged my Hearthguard and were driven back but we both took some losses.

The following turn I used the Discord ability to add some fatigue to the Knights and the Norman Warlord. The Bow then shot them using the Wholehearted ability (which gives me 2 extra attack dice for each fatigue) and got lucky and wiped them out (adding another fatigue to the warlord). The remaining crossbow fired at the Warlord and due to all his fatigue he was killed as well.
 Another attack on my Hearthguard by Norman warriors was set back running but I was down to just one figure in the unit now. Continued use of Discord had most of the remaining Normans exhausted or close to it and the Hearthguard wiped out a warrior unit (dieing himself in the process).

There were a few more fights but by this point it was obviously going to be a Moorish victory.

I had some good luck and John wasn't as familiar with the Norman board as I was with the Moorish one. I do think that with the Perserverance ability it makes sense to make the Moors mostly foot or mostly mounted rather than the more even split I have used in the past. I will have to try a mostly mounted force next time.


Tuesday, December 8, 2015

Fate of a (different) Nation

This past weekend at the club Mike and I played a couple of games of Flames of War: Fate of a Nation. Being more disorganized than usual, I couldn't find all of my Israeli forces so I just brought my Egyptians -- To provide a thin veneer of "historicalness" we decided they would represent the Iraqis in the 1970 Jordanian Civil war.

My force consisted of a T-55 Commander, a platoon of 10 T-55s, a platoon of 6 IS-3s, a platoon of 5 SU-100s and a platoon of 2 ZSU 57-2s. Mike had an HQ of 2 M-48s (I don't remember the Jordanian name for them) 2 platoons each with 3 M-48s and a mechanized infantry platoon with M-113s


 Here is the Egyptian force ready for action (I hadn't brought all my SU-100s so there are some BTR50s standing in for them)

For the first scenario I had to set up in one corner of the table and the Jordanians set up in the 2 adjacent corners and the objectives were in the 4th corner (but didn't count until turn 6). Mike set up one platoon of M-48s in the town area and the mechanized infantry with the HQ tanks in the valley in the big hill. I set up my T-55s to attack the tank platoon and the IS-3s to go after the HQ and infantry.
On the first turn I managed to take out 1 M48.

In a surprise move the Jordanian M113s do a double time move across the front of the IS-3s!
The IS-3s seem to have been surprised since they rolled really badly but you don't have to roll all that well to destroy an APC with a tank!

Mikes saves for the infantry in the APCs were not all that great (and the surviving M113 fled -- oddly the infantry chose to get out before it fled).

Meanwhile, I managed to take out another M48.
One of the reserve platoons of M48s arrived in the valley but by then my force had concentrated and I had managed to destroy the command tank. Shortly after this, I wiped out all the other tanks for convincing Egyptian (Iraqi?) victory.

-----------------------------------------------------------------------------------------------------
For the next came we were again set up in corners but this time the objectives were in the setup corners.
Mike had only one platoon and chose to dismount his infantry around the near objective and put his HQ tanks hidden in the valley. I lined up all my tanks to charge at the infantry thinking I could wipe it out by turn 3 and win before the delayed reserves could arrive. In hindsight this was unwise

As I moved up, I lost my nerve to some extent and made a long chain of T-55s so I could leave some back on the objective. I am not sure why I didn't just move the IS-3s back and all the T-55s forward but this seemed like a clever thing to do at the time.

The T-55s that moved forward assaulted into the infantry but could go no further because I couldn't move my commander and still be able to get good shots on the reserve M-48s that were now arriving.

They managed to destroy one T-55.
And I destroyed one M48 in return
When the second reserve platoon arrived it moved through my tanks to shoot them from behind causing my moment of grief with the Flames of War rules that I usually have in one form or another each session but even now, I think this rule is a bit dumb even when I think of it just in game terms. Oh well. Mike would have won at this point but we then realized that the objective couldn't be on the edge and he moved it in (I would count this as a win for him since we played with the objective there)
We carried on for another few turns and I managed to kill the Jordanian CinC and enough stuff to force a company check so I managed to win in the "overtime".

I am still enjoying the Fate of a Nation games, which is odd because I don't really like really tank heavy games of regular Flames of War. I guess this will soon be eclipsed by the Team Yankee stuff but I think I will come back to this from time to time.


Thursday, November 12, 2015

Saga Tournament at the OMG

This past weekend we had a Saga tournament at the club. Because my painting had been slower than planned (big surprise!) I had planned to take a Saracen warband rather than the Mutatawwi'a list but Mike convinced me to use my camels so I went with the Mutatawwi'a (but I had not really read over the battleboard, and I think it is a tricky one).

Before I get to the details of the games, here is a recap of the mistakes I made with the rules (or at least the ones I am aware of).

Melee vs Melee/Reaction -- Both "Suicidal Charge" and "Allah Provides" are Melee abilities which means I shouldn't have paid for them (by sacrificing units) until after the attack dice are calculated (contrasting with Melee/Reaction which are done before the attack dice are calculated). This would have meant I was more likely to kill the unit I was attacking. This also makes the "Fatal Blow" ability much more appealing

Naffata -- This I got completely wrong (my only excuse is that someone made a similar mistake in a battle report I read and I find the rule book hard to read without my reading glasses which I had left at home).  I was using them as a melee unit where they should only get a ranged attack every time their unit moves. This attack has range S and does the 1-3 dice with "1"s killing the Naffata (the part that I did get right). If the defender takes any hits they also take 2 fatigue (3 if mounted) and the unit the Naffata is with takes a fatigue.

I played 3 games, the first against Stan's Crusaders the second against George's Vikings and the last against Nick's Anglo-Saxons

Game 1

The first scenario was the one where you have to kill the opposing warlord. At this stage I had no real idea what to do with this force but moving forward always seems to be a good strategy.

I had used the "Move Like the Djinn" ability to move my foot troops up quickly but then realized that they should be fatigued if they don't end up in contact with the enemy so I ended up resting them on the second turn so it ended up not being as useful just for moving up.

This was my first try at the "Suicidal Charge" ability -- it was quite devastating to the enemy but it is probably not really cost effective to trade 7 of my Hearthguard for 4 enemy Hearthguard!
With the left flank looking bare, I moved up on the right.

At the end my Warlord facing off against Stan's Warlord and his Warrior Priest.

This was the only game I won (and I think I was quite lucky at the end to win it).

Game 2
The second game against George's Vikings, I don't remember the mission but the victory was based solely on slaughter points,

For this game, I used the camel hearthguard as 2 units of 4 rather than one of 8 but kept everything else the same.

Again, I moved forward as quickly as I could.
The most exciting part was our warlords in a fight to the death which I won after many rounds. My warlord fell to George's hearthguard the following turn and I lost on slaughter points but it was still an exciting game. I had a slightly better grasp on my battleboard this time but George knew how to use his Vikings.
Game 3
 In game 3 against Nick's Anglo-Saxons we had to bid to defend the village. Neither of us wanted to defend so we diced off and I ended up defending.


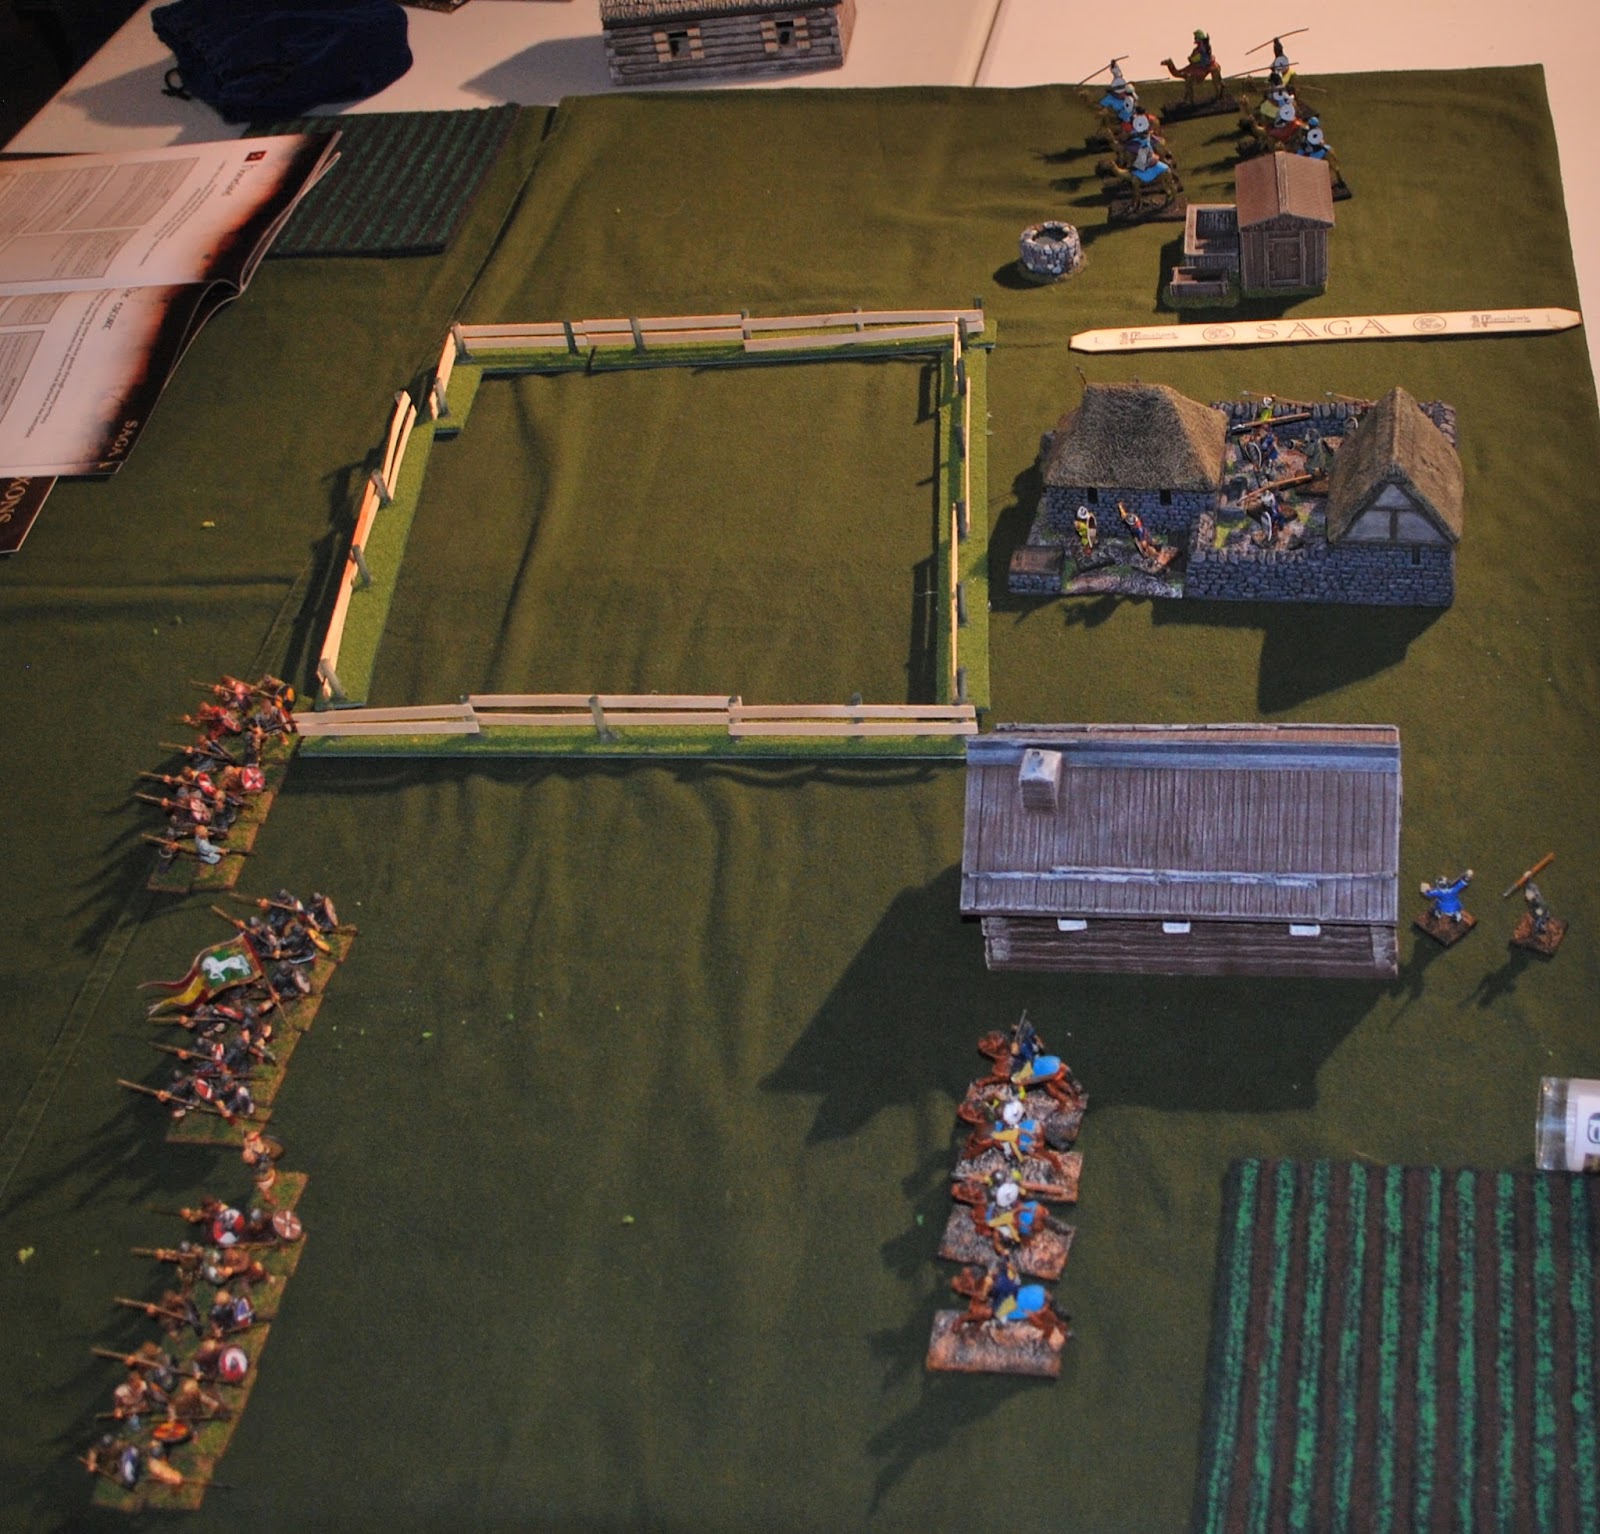
The defender has to end the game with one building so I put one foot unit in each of 2 buildings and left the third one empty. I probably should have concentrated my mounted troops but I had visions of them galloping (if camels gallop) around the fence and striking the Anglo-Saxons as they reached the buildings.

Nick moved up to attack the first building and drove back my cavalry (it would have been smart to put them more than M away from the Anglo Saxon start line)

My camels moved up to the fence as the first building fell under the Anglo-Saxon attack.

After the Anglo-Saxons attacked one of my camel units and then the other did the "Suicidal Charge" (this time with "Allah Provides") there wasn't much left of the forces that weren't involved in the fighting for the second house.

The house managed to hold out (with one figure) until the last turn but couldn't last that turn. I think this would be a very hard battle to win against a foot force.

-------------------------------------------------------------------------------------------

I really enjoy Saga and should play it more (at least enough  so that I can use at least one faction well -- I don't think I have played any faction more than 3 times). This tourney has kickstarted my painting as well, finishing of my camels and working on the rest of the Mutatawwi'a.  


Monday, September 7, 2015

Bolt Action Assembly and Play

I played some  Bolt Action at the club this weekend run by Jeff. We played a series of 2 linked games. In the first, we as the British had to intercept a hafltrack carrying a secret cargo before it ran off the table and in the second we had to attack a V2 launch site and capture or destroy the rocket.

I didn't take any pictures but to give a rough rundown of the action: In the first game we had 2 sections of infantry, 2 Bren gun carriers, a medium mortar and a 2nd Lt. The Germans had 2 squads, an armed Kubelwagen, the halftrack and their command unit had 3 figures. We were probably about equal in firepower with the British having more figures. We moved up towards the road and exchanged fire for a few turns and then managed to rush out a heavily pinned unit to capture the halftrack. The Germans counterattacked and killed the section that had captured the halftrack but in the end it was a British victory.

For the second game we had the mortar, 6 sections of infantry, the HQ and a Sherman. The Germans had a mix of troops, a PAK 40 AT gun an Armoured Car and a Haftrack.  We were a bit hesitant about moving forward and probably concentrated too much on the AT gun so we eventually realized there was no way we would get our victory conditions. I am not entirely sure what the best choice would have been but we certainly needed to push harder.

 We had some new people out to the club for this game so that was good as well.

_________________________________________________________________________________

I finally have all of my original German figures painted. They just need to have the basing done and I may try to put the decals on their helmets (I will post some pictures soon). The support weapons are nearly done as well.

Once I got the last bit of paint on, I decided I should start assembling the Canadian troops. I had forgotten how much of a pain it is to assemble the Warlord  Games figures. I generally prefer plastics to metals and these are nice figures just a pain to assemble. Each of the arms are separate and the weapon is another piece so getting all 3 of those together in a way that looks sensible is a bit of a challenge.

The helmets are also separate from the heads which is an extra step. In many ways this is a good thing but it is also a bit of a pain. This blog suggests that the best way to do this is to glue the weapon into the right hand before attaching the arm. I tried this for my Germans and I gave it a go for the Canadians as well but I find the best way is to glue on the right arm without the weapon (but checking how the weapon will fit so that it is in a reasonable position) and then doing the left arm and the weapon once the glue is set.

The legs for the kneeling guy are also a bit more trouble than they should be -- they really can only go together one way so if there had been a tab to keep things aligned it would have made the task trivial. I think that is my main complaint is that they didn't really think about what they could do to make assembly easier. I believe that they are getting better, the new German sets have the weapons attached to the arm (or at least the hand?) which should make things quicker.

I have managed to get 5 guys together so far (3 rifle, 1 PIAT and 1 light mortar) and I think I should be able to get the others down over the next week or so.

The little pieces in front of them are the water canteens and the bayonet scabbards. I didn't put a lot of equipment on my Germans because they are Panzer Grenadiers and they are on the defensive but I will load up the Canadians (which reminds me of one more complaint, the weapon sprue could do with more shovels and more rifle -- and a hand with a light mortar bomb would have been nice).

Despite all my complaints I do like these figures and the Germans were easy to paint up once I got past my painters block.

I also assembled some metal support weapons -- a vickers MG, a medium mortar and a 6 pdr AT gun

These were much easier to get together (but I think the plastics will be easier to paint)